Aug 14, 2011

I like working small, which is I think why insects appeal to me. I created this as a challenge to make something larger than I'm usually comfortable with. It ended up being just a little larger than 12"x12". I started by composing the entire thing in Illustrator and then cutting it from two different pieces of Canson drawing paper. The gray and green are separate pieces glued together.
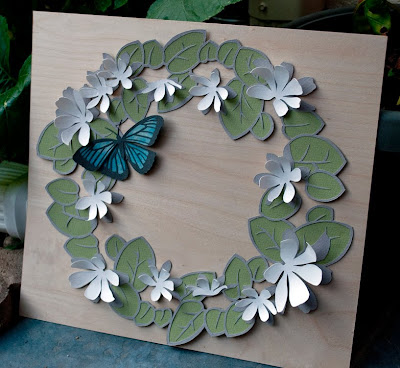
I started this piece with the thought that it would be a wreath. The three dimensional flowers were a bit of an afterthought but combined with the gray frame they give the entire piece a bit of depth. I used clay sculpting tools to shape the flowers.
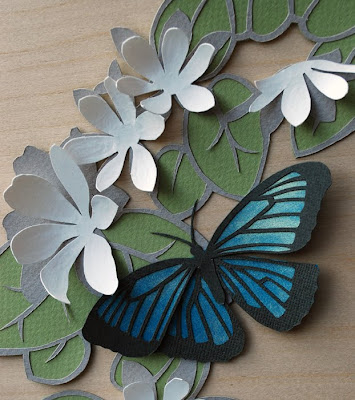
I intended to add more than one butterfly, but once I'd finished the one I decided that adding more would overwhelm the delicate florals. The wings are a dark gray because black seemed too harsh. The blue was a rich ocean color that I painted with a pearlescent pigment. This painting ended up serving two purposes. First, it created a soft fluttery look that adds realism to the butterfly. Second, the wet technique curled the paper just a bit and gave a realistic dimension to the wings.
The entire wreath is mounted to a piece of birch plywood which I chose for it's lightness in weight and color. Birch plywood has a shimmery quality and it reflects light in an interesting way. I need to find a larger piece of wood to back it with so that I can frame it.

Jul 26, 2011

I was inspired by a lovely white on white piece that a woman in my paper cutting class started this week. This is a tunnel book. Each panel is attached to the side accordion folds with tabs that stick out. I wanted to experiment with cutting the swoopy garlands so that was my starting point.
The bird on a perch seemed like the perfect thing to sit underneath the garlands. I added the bunting panel to add some interest to the top. The front and back were painted with a soft petal pink watercolor wash and the garlands on the back layer were just dotted on with a slightly opaque mix of the same pink and a grey.
I am so happy with this book. A tiny LED candle set in the back creates a wonderful mood within the piece and pulls it all together.

Jul 12, 2011

begin again


I spend a lot of time looking for inspiration. This starts simply as looking for reference materials and turns into a terrible fall down a deep rabbit hole. It's so easy to get mired in ideas and forget that you have to eventually create something from those thoughts you are hoarding.
Today I've collected materials, and will create something. I will be inspired by my own process.

Jul 10, 2011

I started a paper cutting class this week. I was excited when I signed up and I'm even more excited now. This was the first project for the class which I think is brilliant. This is such an approachable project but it is also well suited to pretty much any skill level.
I am always a little uncertain when confronted with having to draw and this was no different. Once I'd traced my hand I started by filling in the fingers with abstract shapes and sort of went from there. Turning something into a silhouette covers almost all evidence of terrible drawing skills. I was really happy with the final product.

Jun 20, 2011

The Apiarist part two, Vida

This is a companion my bee flag book. I had a pile of bees after finishing the first piece which inspired this book. I chose muted colors, I knew that once finished bright colors would make the piece garish and would distract from the intricate details. I think the colors I chose give it a sun washed feeling. One of the orange tones is carried through from the bee book.
The cover closes with a strap that isn't attached. I couldn't figure out how I wanted the buckle to sit and I didn't like the idea of gluing the ribbon.
The flags in this book have a variety of flowers and leaves on them. I wanted to create the idea of a field of flowers or a garden. There are bees tucked in among the flowers.
Like the last book, this one has a single word in it, again I spent a lot of time thinking of just the right word. Vida seemed most appropriate, it felt more elegant than simply life.

Jun 7, 2011


This is sort of an excerpt from a book that I made, the concept was advice you would get from insects. The moth was my favorite, I think it is possibly the most meaningful statement I came up with for the book.

Jun 3, 2011

altered book, the rest of it

Before you start cutting into the actual pages of the book, trace your template onto the first page you'll be cutting. Even if you're cutting a simple shape, you'll have better luck using a template because it will keep your lines straight and uniform through the entire thickness of the book.
Cut 5-10 pages at a time, it will keep your lines crisp and reduce the number of times you have to go back and cut away at those little corners that don't come out willingly. I have a small cutting mat that I can put inside the book to protect the pages underneath, it also adds stability when cutting. Finally, clamp your entire book together, it's important that the spine stay straight otherwise all of your cutting will end up askew. If your book is thin enough you can use binder clips, or like me, you can use spring clamps from the hardware store.


Jun 1, 2011

altered book, step two

Step two: get up the nerve to cut the book, this is pretty much the worst part. This book came from a thrift store so I can't just pick up another one if I do something wrong.
This book will have layers that you look through so the first cut I had to make was the hole in the cover. To do this I drew the shape in pencil and then cut through with an x-acto.

May 31, 2011

altered book, step one

Step one in my altered book process, well aside from picking the book and deciding on content; cutting templates.